For many critical application functions, including streaming and e-commerce, monolithic architecture is no longer sufficient. With current demands for real-time event data and cloud service usage, many modern applications, such as Netflix and Lyft, have shifted to an event-driven microservices approach. Separated microservices can operate independently of one another and enhance a code base’s adaptability and scalability.
But what is an event-driven microservices architecture, and why should you use it? We’ll examine the foundational aspects and create a complete blueprint for an event-driven microservices project using Python and Apache Kafka.
Using Event-driven Microservices
Event-driven microservices combine two modern architecture patterns: microservices architectures and event-driven architectures. Though microservices can pair with request-driven REST architectures, event-driven architectures are becoming increasingly relevant with the rise of big data and cloud platform environments.
What Is a Microservices Architecture?
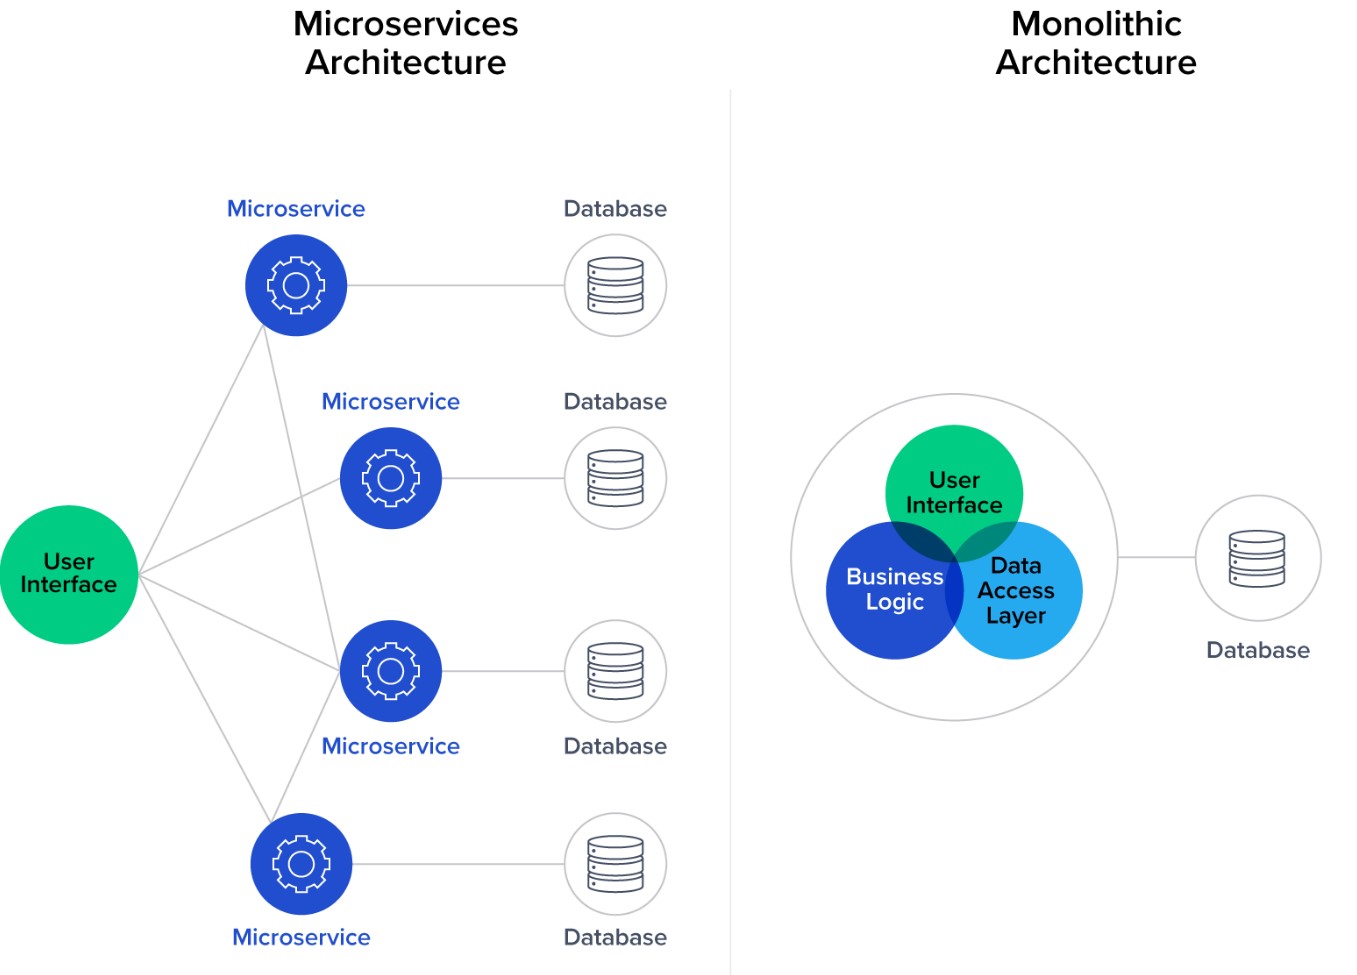
A microservices architecture is a software development technique that organizes an application’s processes as loosely coupled services. It is a type of service-oriented architecture (SOA).
In a traditional monolithic structure, all application processes are inherently interconnected; if one part fails, the system goes down. Microservices architectures instead group application processes into separate services interacting with lightweight protocols, providing improved modularity and better app maintainability and resiliency.
Though monolithic applications may be simpler to develop, debug, test, and deploy, most enterprise-level applications turn to microservices as their standard, which allows developers to own components independently. Successful microservices should be kept as simple as possible and communicate using messages (events) that are produced and sent to an event stream or consumed from an event stream. JSON, Apache Avro, and Google Protocol Buffers are common choices for data serialization.
What Is an Event-driven Architecture?
An event-driven architecture is a design pattern that structures software so that events drive the behavior of an application. Events are meaningful data generated by actors (i.e., human users, external applications, or other services).
Our example project features this architecture; at its core is an event-streaming platform that manages communication in two ways:
- Receiving messages from actors that write them (usually called publishers or producers)
- Sending messages to other actors that read them (usually called subscribers or consumers)
In more technical terms, our event-streaming platform is software that acts as the communication layer between services and allows them to exchange messages. It can implement a variety of messaging patterns, such as publish/subscribe or point-to-point messaging, as well as message queues.
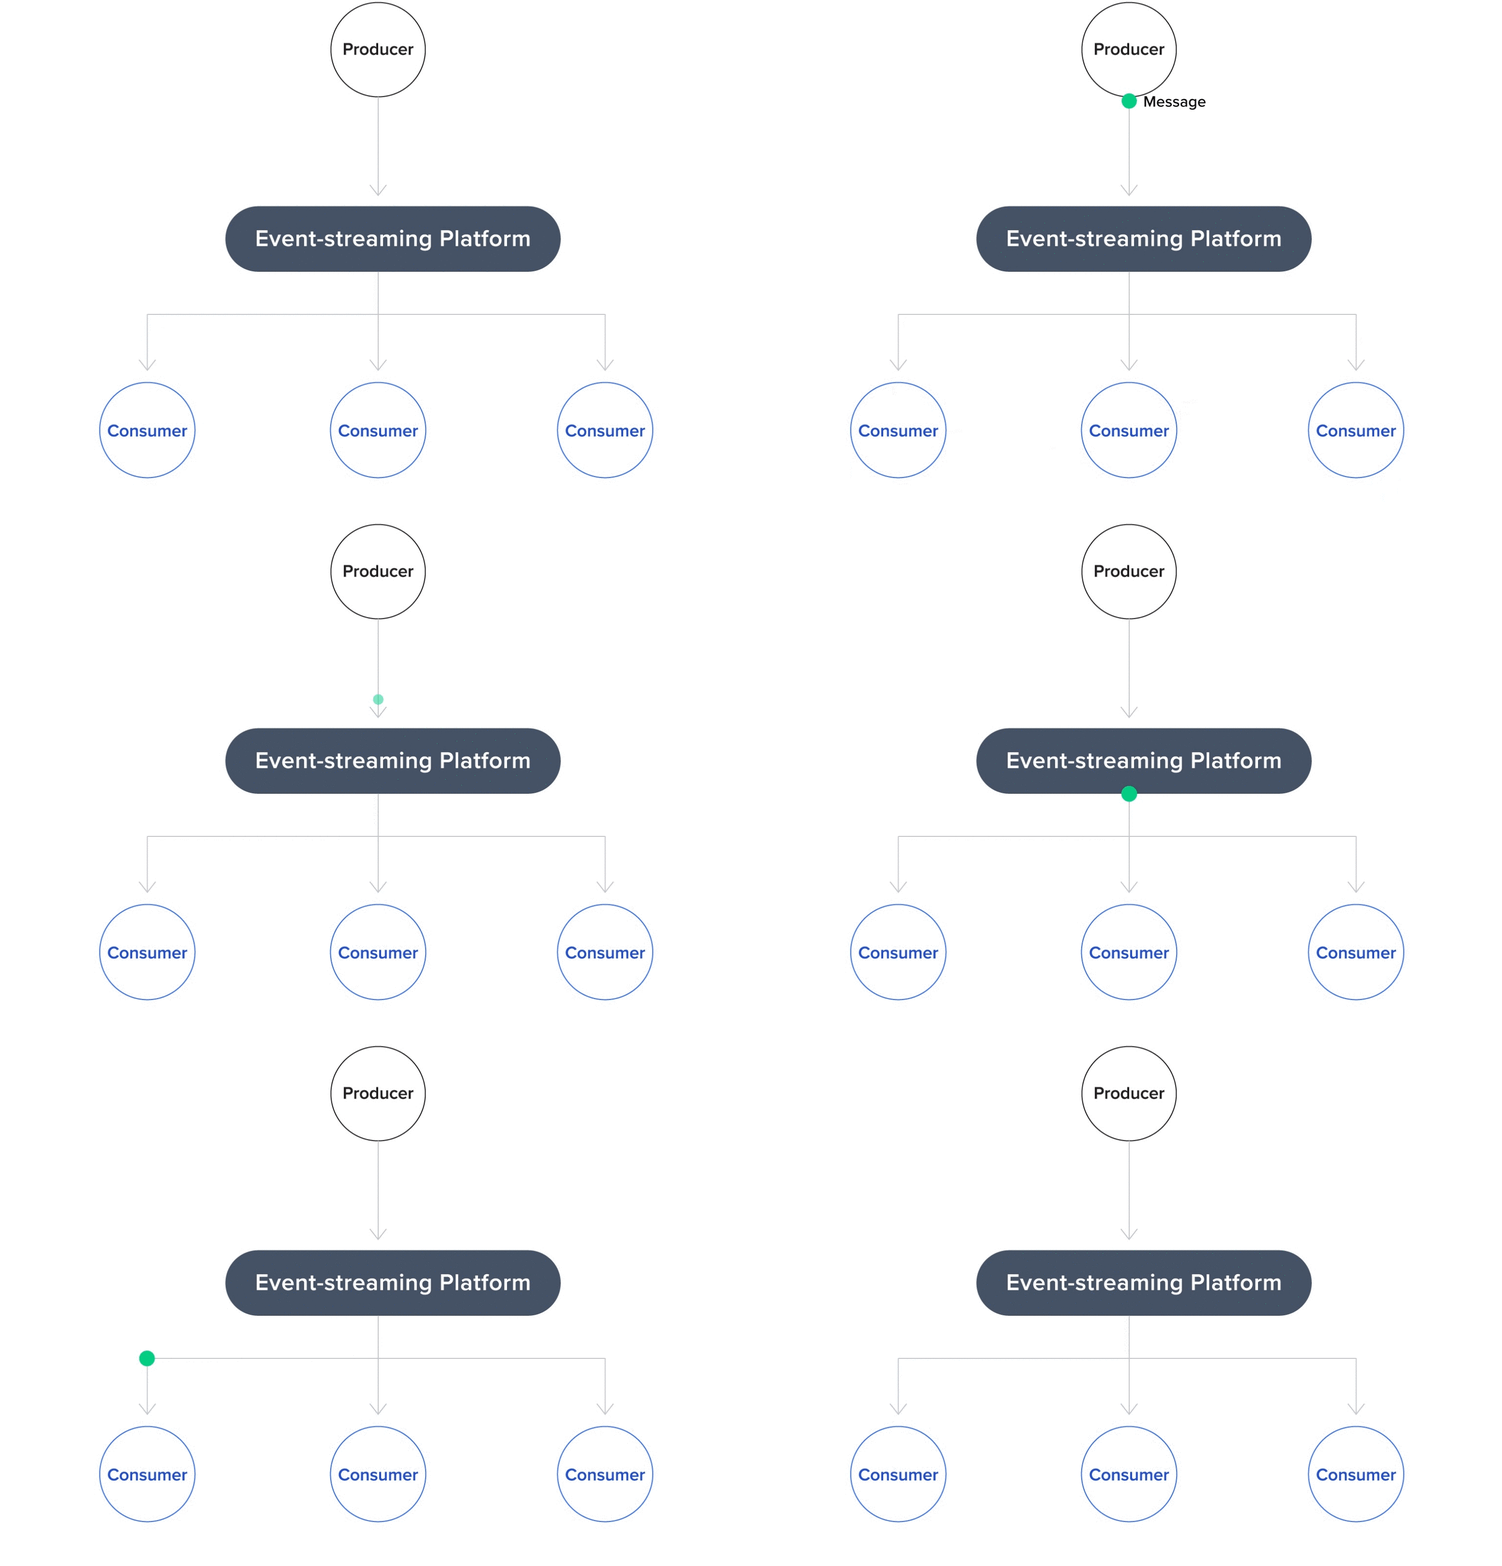
Using an event-driven architecture with an event-streaming platform and microservices offers a wealth of benefits:
- Asynchronous communications: The ability to independently multitask allows services to react to events whenever they are ready instead of waiting on a previous task to finish before starting the next one. Asynchronous communications facilitate real-time data processing and make applications more reactive and maintainable.
- Complete decoupling and flexibility: The separation of producer and consumer components means that services only need to interact with the event-streaming platform and the data format they can produce or consume. Services can follow the single responsibility principle and scale independently. They can even be implemented by separate development teams using unique technology stacks.
- Reliability and scalability: The asynchronous, decoupled nature of event-driven architectures further amplifies app reliability and scalability (which are already advantages of microservices architecture design).
With event-driven architectures, it’s easy to create services that react to any system event. You can also create semi-automatic pipelines that include some manual actions. (For example, a pipeline for automated user payouts might include a manual security check triggered by unusually large payout values before transferring funds.)
Choosing the Project Tech Stack
We will create our project using Python and Apache Kafka paired with Confluent Cloud. Python is a robust, reliable standard for many types of software projects; it boasts a large community and plentiful libraries. It is a good choice for creating microservices because its frameworks are suited to REST and event-driven applications (e.g., Flask and Django). Microservices written in Python are also commonly used with Apache Kafka.
Apache Kafka is a well-known event-streaming platform that uses a publish/subscribe messaging pattern. It is a common choice for event-driven architectures due to its extensive ecosystem, scalability (the result of its fault-tolerance abilities), storage system, and stream processing abilities.
Lastly, we will use Confluent as our cloud platform to efficiently manage Kafka and provide out-of-the-box infrastructure. AWS MSK is another excellent option if you’re using AWS infrastructure, but Confluent is easier to set up as Kafka is the core part of its system and it offers a free tier.
Implementing the Project Blueprint
We’ll set up our Kafka microservices example in Confluent Cloud, create a simple message producer, then organize and improve it to optimize scalability. By the end of this tutorial, we will have a functioning message producer that successfully sends data to our cloud cluster.
Kafka Setup
We’ll first create a Kafka cluster. Kafka clusters host Kafka servers that facilitate communication. Producers and consumers interface with the servers using Kafka topics (categories storing records).
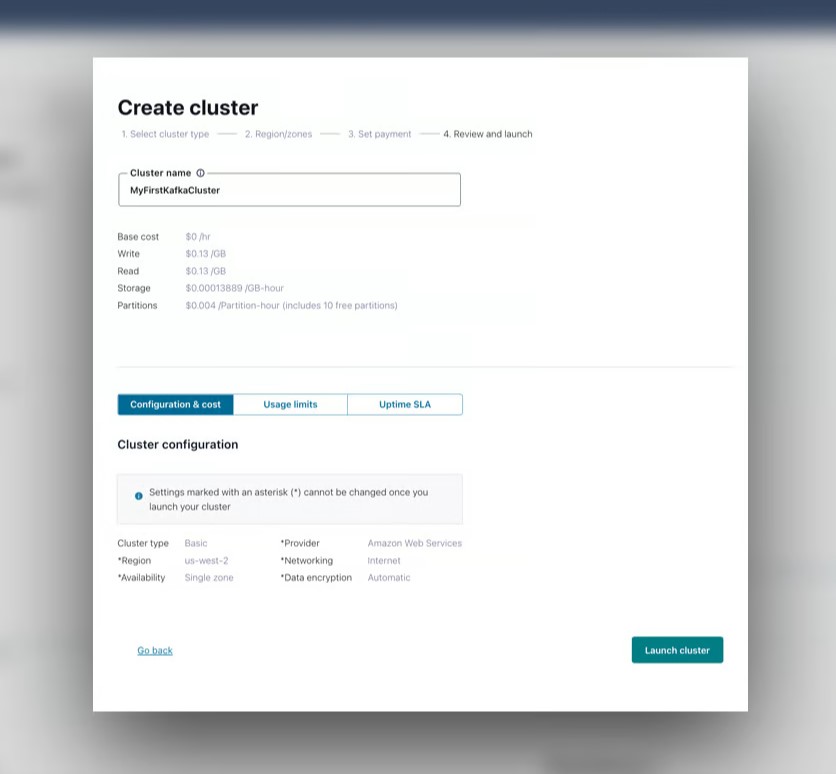
- Sign up for Confluent Cloud. Once you create an account, the welcome page appears with options for creating a new Kafka cluster. Select the Basic configuration.
- Choose a cloud provider and region. You should optimize your choices for the best cloud ping results from your location. One option is to choose AWS and perform a cloud ping test (click HTTP Ping) to identify the best region. (For the scope of our tutorial, we will leave the “Single zone” option selected in the “Availability” field.)
- The next screen asks for a payment setup, which we can skip since we are on a free tier. After that, we will enter our cluster name (e.g., “MyFirstKafkaCluster”), confirm our settings, and select Launch cluster.
With a working cluster, we are ready to create our first topic. In the left-hand menu bar, navigate to Topics and click Create topic. Add a topic name (e.g., “MyFirstKafkaTopic”) and continue with the default configurations (including setting six partitions).
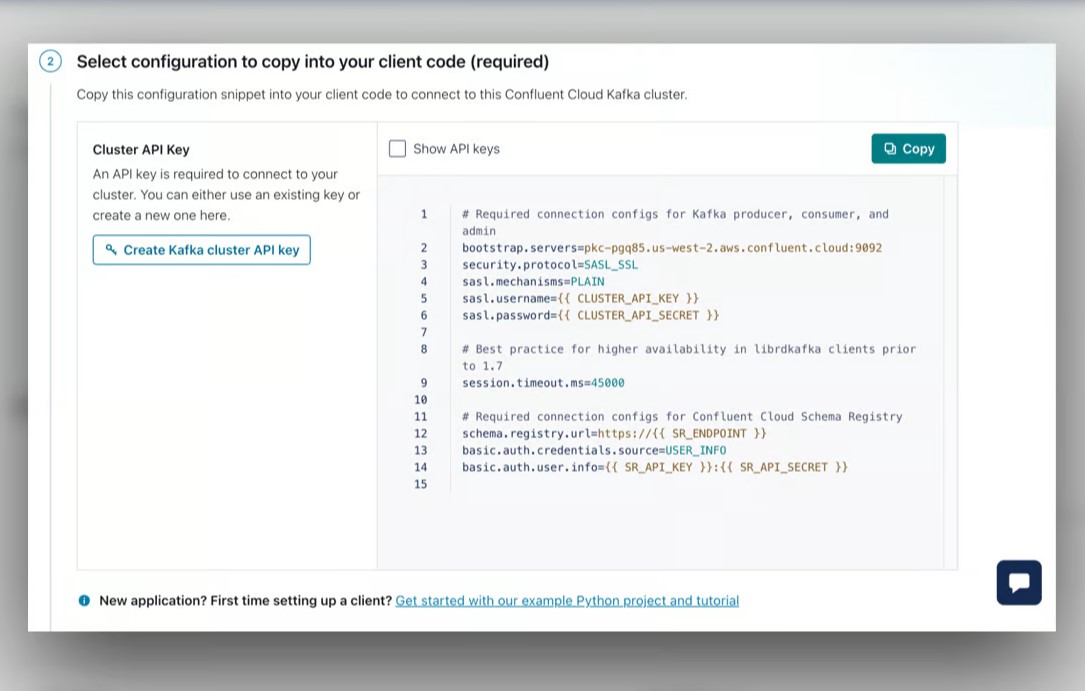
Before creating our first message, we must set up our client. We can easily Configure a client from our newly created topic overview (alternatively, in the left-hand menu bar, navigate to Clients). We’ll use Python as our language and then click Create Kafka cluster API key.
At this point, our event-streaming platform is finally ready to receive messages from our producer.
Simple Message Producer
Our producer generates events and sends them to Kafka. Let’s write some code to create a simple message producer. I recommend setting up a virtual environment for our project since we will be installing multiple packages in our environment.
First, we will add our environment variables from the API configuration from Confluent Cloud. To do this in our virtual environment, we’ll add export SETTING=value for each setting below to the end of our activate file (alternatively, you can add SETTING=value to your .env file):
export KAFKA_BOOTSTRAP_SERVERS=<bootstrap.servers>
export KAFKA_SECURITY_PROTOCOL=<security.protocol>
export KAFKA_SASL_MECHANISMS=<sasl.mechanisms>
export KAFKA_SASL_USERNAME=<sasl.username>
export KAFKA_SASL_PASSWORD=<sasl.password>
Make sure to replace each entry with your Confluent Cloud values (for example, <sasl.mechanisms> should be PLAIN), with your API key and secret as the username and password. Run source env/bin/activate, then printenv. Our new settings should appear, confirming that our variables have been correctly updated.
We will be using two Python packages:
python-dotenvpackage: Loads and sets environment variables.confluent-kafkapackage: Provides producer and consumer functionality; our Python client for Kafka.
We’ll run the command pip install confluent-kafka python-dotenv to install these. There are many other packages for Kafka in Python that may be useful as you expand your project.
Finally, we’ll create our basic producer using our Kafka settings. Add a simple_producer.py file:
import os
from confluent_kafka import KafkaException, Producer
from dotenv import load_dotenv
def main():
settings = {
’bootstrap.servers’: os.getenv(‘KAFKA_BOOTSTRAP_SERVERS’),
’security.protocol’: os.getenv(‘KAFKA_SECURITY_PROTOCOL’),
’sasl.mechanisms’: os.getenv(‘KAFKA_SASL_MECHANISMS’),
’sasl.username’: os.getenv(‘KAFKA_SASL_USERNAME’),
’sasl.password’: os.getenv(‘KAFKA_SASL_PASSWORD’),
}
producer = Producer(settings)
producer.produce(
topic=’MyFirstKafkaTopic’,
key=None,
value=’MyFirstValue-111′,
)
producer.flush() # Wait for the receive confirmation
if __name__ == ‘__main__’:
load_dotenv()
main()
With this straightforward code we create our producer and send it a simple test message. To test the result, run python3 simple_producer.py:
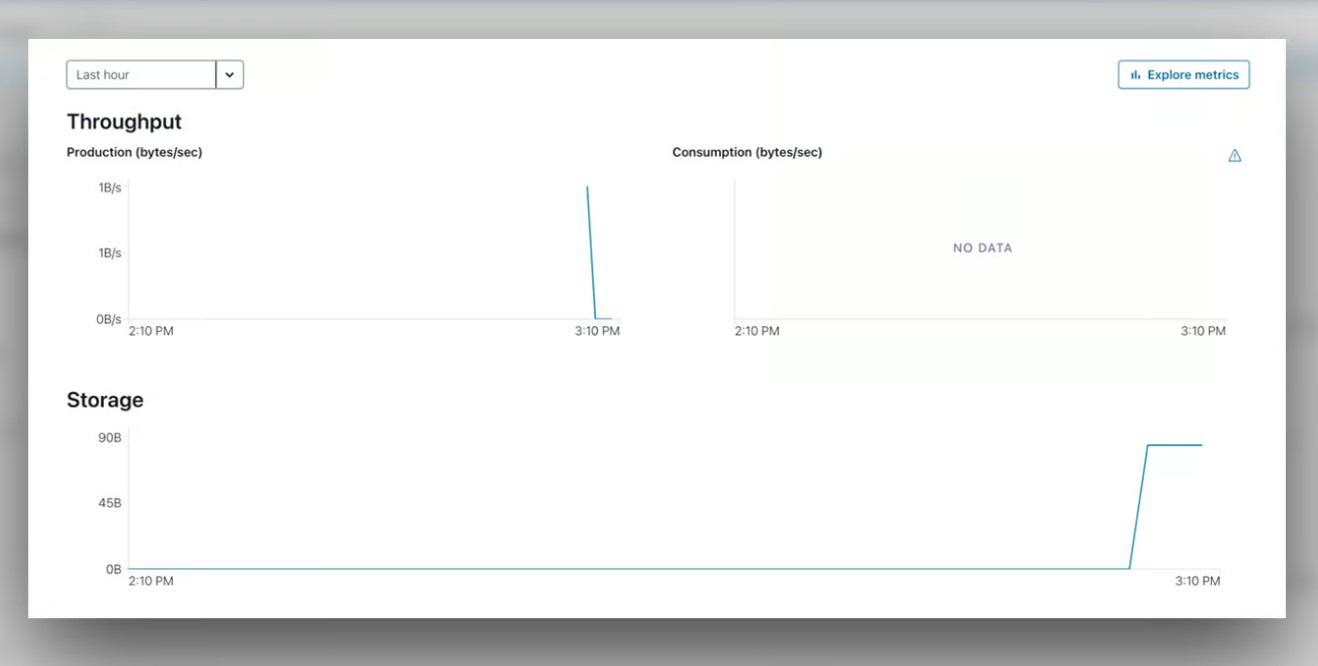
Checking our Kafka cluster’s Cluster Overview > Dashboard, we will see a new data point on our Production graph for the message sent.
Custom Message Producer
Our producer is up and running. Let’s reorganize our code to make our project more modular and OOP-friendly. This will make it easier to add services and scale our project in the future. We’ll split our code into four files:
kafka_settings.py: Holds our Kafka configurations.kafka_producer.py: Contains a customproduce()method and error handling.kafka_producer_message.py: Handles different input data types.advanced_producer.py: Runs our final app using our custom classes.
First, our KafkaSettings class will encapsulate our Apache Kafka settings, so we can easily access these from our other files without repeating code:
import os
class KafkaSettings:
def __init__(self):
self.conf = {
’bootstrap.servers’: os.getenv(‘KAFKA_BOOTSTRAP_SERVERS’),
’security.protocol’: os.getenv(‘KAFKA_SECURITY_PROTOCOL’),
’sasl.mechanisms’: os.getenv(‘KAFKA_SASL_MECHANISMS’),
’sasl.username’: os.getenv(‘KAFKA_SASL_USERNAME’),
’sasl.password’: os.getenv(‘KAFKA_SASL_PASSWORD’),
}
Next, our KafkaProducer allows us to customize our produce() method with support for various errors (e.g., an error when the message size is too large), and also automatically flushes messages once produced:
from confluent_kafka import KafkaError, KafkaException, Producer
from kafka_producer_message import ProducerMessage
from kafka_settings import KafkaSettings
class KafkaProducer:
def __init__(self, settings: KafkaSettings):
self._producer = Producer(settings.conf)
def produce(self, message: ProducerMessage):
try:
self._producer.produce(message.topic, key=message.key, value=message.value)
self._producer.flush()
except KafkaException as exc:
if exc.args[0].code() == KafkaError.MSG_SIZE_TOO_LARGE:
pass # Handle the error here
else:
raise exc
In our example’s try-except block, we skip over the message if it is too large for the Kafka cluster to consume. However, you should update your code in production to handle this error appropriately. Refer to the confluent-kafka documentation for a complete list of error codes.
Now, our ProducerMessage class handles different types of input data and correctly serializes them. We’ll add functionality for dictionaries, Unicode strings, and byte strings:
import json
class ProducerMessage:
def __init__(self, topic: str, value, key=None) -> None:
self.topic = f'{topic}’
self.key = key
self.value = self.convert_value_to_bytes(value)
@classmethod
def convert_value_to_bytes(cls, value):
if isinstance(value, dict):
return cls.from_json(value)
if isinstance(value, str):
return cls.from_string(value)
if isinstance(value, bytes):
return cls.from_bytes(value)
raise ValueError(f’Wrong message value type: {type(value)}’)
@classmethod
def from_json(cls, value):
return json.dumps(value, indent=None, sort_keys=True, default=str, ensure_ascii=False)
@classmethodd
def from_string(cls, value):
return value.encode(‘utf-8’)
@classmethod
def from_bytes(cls, value):
return value
Finally, we can build our app using our newly created classes in advanced_producer.py:
from dotenv import load_dotenv
from kafka_producer import KafkaProducer
from kafka_producer_message import ProducerMessage
from kafka_settings import KafkaSettings
def main():
settings = KafkaSettings()
producer = KafkaProducer(settings)
message = ProducerMessage(
topic=’MyFirstKafkaTopic’,
value={“value”: “MyFirstKafkaValue”},
key=None,
)
producer.produce(message)
if __name__ == ‘__main__’:
load_dotenv()
main()
We now have a neat abstraction above the confluent-kafka library. Our custom producer possesses the same functionality as our simple producer with added scalability and flexibility, ready to adapt to various needs. We could even change the underlying library entirely if we wanted to, which sets our project up for success and long-term maintainability.
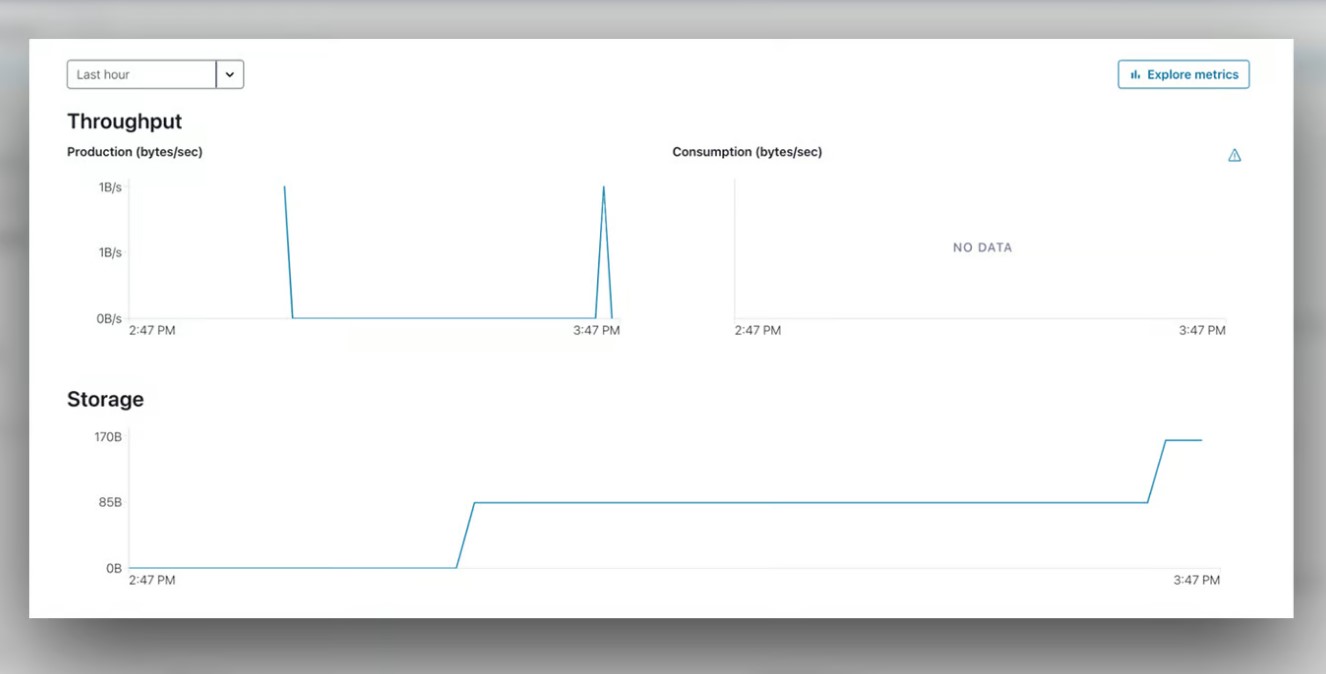
After running python3 advanced_producer.py, we see yet again that data has been sent to our cluster in the Cluster Overview > Dashboard panel of Confluent Cloud. Having sent one message with the simple producer, and a second with our custom producer, we now see two spikes in production throughput and an increase in overall storage used.
Looking Ahead: From Producers to Consumers
An event-driven microservices architecture will enhance your project and improve its scalability, flexibility, reliability, and asynchronous communications. This tutorial has given you a glimpse of these benefits in action. With our enterprise-scale producer up and running, sending messages successfully to our Kafka broker, the next steps would be to create a consumer to read these messages from other services and add Docker to our application.

0 Comments